Create Android Project
Make sure you have an up to date version of Android Studio. I am using version 1.4.1
Open Android Studio and create a New Project, naming it as you wish. Click Next, choose Minimum API level 17 and click Next again. Choose Blank Activity as the first activity, name it LoginActivity and click Finish.
Add Internet permissions to AndroidManifest.xml:
<uses-permission android:name="android.permission.INTERNET" />
Next we add another blank activity to the project. Right Click the package and select New -> Activity -> Blank Activity. Leave its name as default and click finish.
The final project for this article can be found on Github. Make sure you change the Facebook API details to match you own.
Creating Facebook App ID
To use the Facebook API we have to add an app entry to our Facebook Developer Apps dashboard. You will need a Facebook developer account if you don’t have one already. Choose a random category and click Create App ID.
On the next page, scroll down to the bottom and complete both fields with the project packages names.
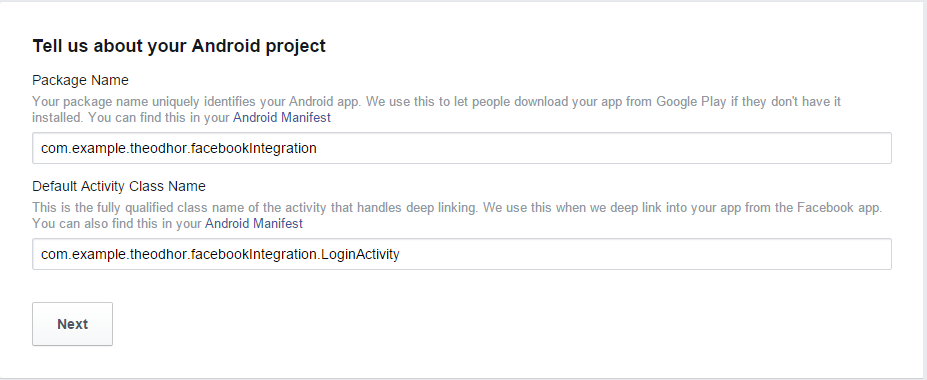
Click Next.
Now we need to add a Development Key Hash. There are two ways of generating one. The first option is using the command line.
Windows
keytool -exportcert -alias androiddebugkey -keystore %HOMEPATH%\.android\debug.keystore | openssl sha1 -binary | openssl base64Mac
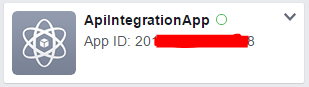
keytool -exportcert -alias androiddebugkey -keystore ~/.android/debug.keystore | openssl sha1 -binary | openssl base64Open Facebook’s My Apps section and copy the App ID:
Open strings.xml in your project and add this line of code:
<string name="app_id">{Your App ID here}</string>Setting up Facebook SDK
Open build.gradle (Project) and add mavenCentral() to both repository sections. Then open build.gradle (Module) and add the SDK library by adding this line to `dependencies:
compile 'com.facebook.android:facebook-android-sdk:4.6.0'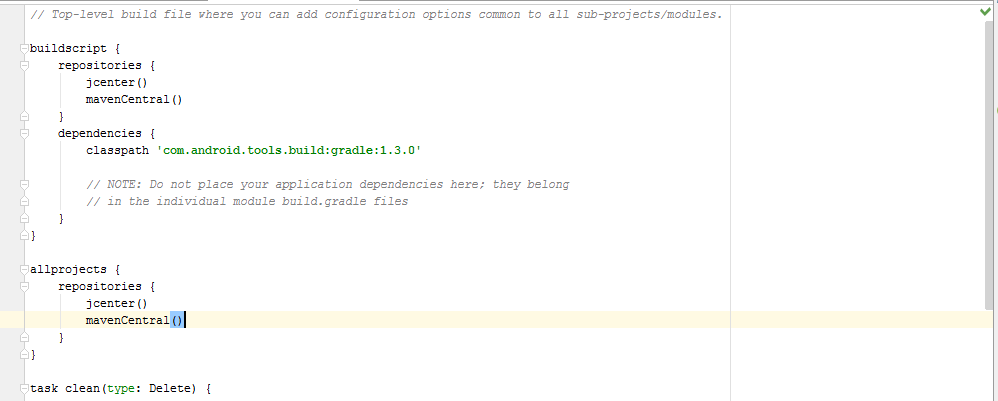
Now sync gradle.
Activities and Layouts
Open AndroidManifest.xml and make these changes.
Change the MainActivity label:
<activity
      android:name=".MainActivity"
      android:label="@string/app_name"            android:theme="@style/AppTheme.NoActionBar" >
</activity>
Add these tags:
<meta-data
    android:name="com.facebook.sdk.ApplicationId"
    android:value="@string/app_id" />

<activity
    android:name="com.facebook.FacebookActivity"
    android:label="@string/app_name"
    android:screenOrientation="portrait"/>

<provider              android:authorities="com.facebook.app.FacebookContentProvider"                 android:name="com.facebook.FacebookContentProvider"
android:exported="true"/>
Now we are going to work with Java classes and layouts.
First we are going to work with LoginActivity.java. This class opens an authenticated connection to the Facebook API and gets data from it.
Add these lines before the onCreate method inside the class:
private CallbackManager callbackManager;
private AccessTokenTracker accessTokenTracker;
private ProfileTracker profileTracker;

//Facebook login button
private FacebookCallback<LoginResult> callback = new FacebookCallback<LoginResult>() {
    @Override
    public void onSuccess(LoginResult loginResult) {
        Profile profile = Profile.getCurrentProfile();
        nextActivity(profile);
    }
    @Override
    public void onCancel() {        }
    @Override
    public void onError(FacebookException e) {      }
};
Here we create a FacebookCallback called callback. This executes the next action after we get a response from the Facebook API and the method for that is onSuccess().
Inside the onSuccess method we create a new Facebook Profile and get data for that profile. Later we will create a simple function called nextActivity() that will switch our activity.
We do not need the code for the FloatingActionButton so we will replace it. We are going to initialize the Facebook SDK so we can use its functions and methods. Inside onCreate() add these lines:
FacebookSdk.sdkInitialize(getApplicationContext());
callbackManager = CallbackManager.Factory.create();
accessTokenTracker = new AccessTokenTracker() {
@Override
protected void onCurrentAccessTokenChanged(AccessToken oldToken, AccessToken newToken) {
}
};
profileTracker = new ProfileTracker() {
@Override
protected void onCurrentProfileChanged(Profile oldProfile, Profile newProfile) {
nextActivity(newProfile);
}
};
accessTokenTracker.startTracking();
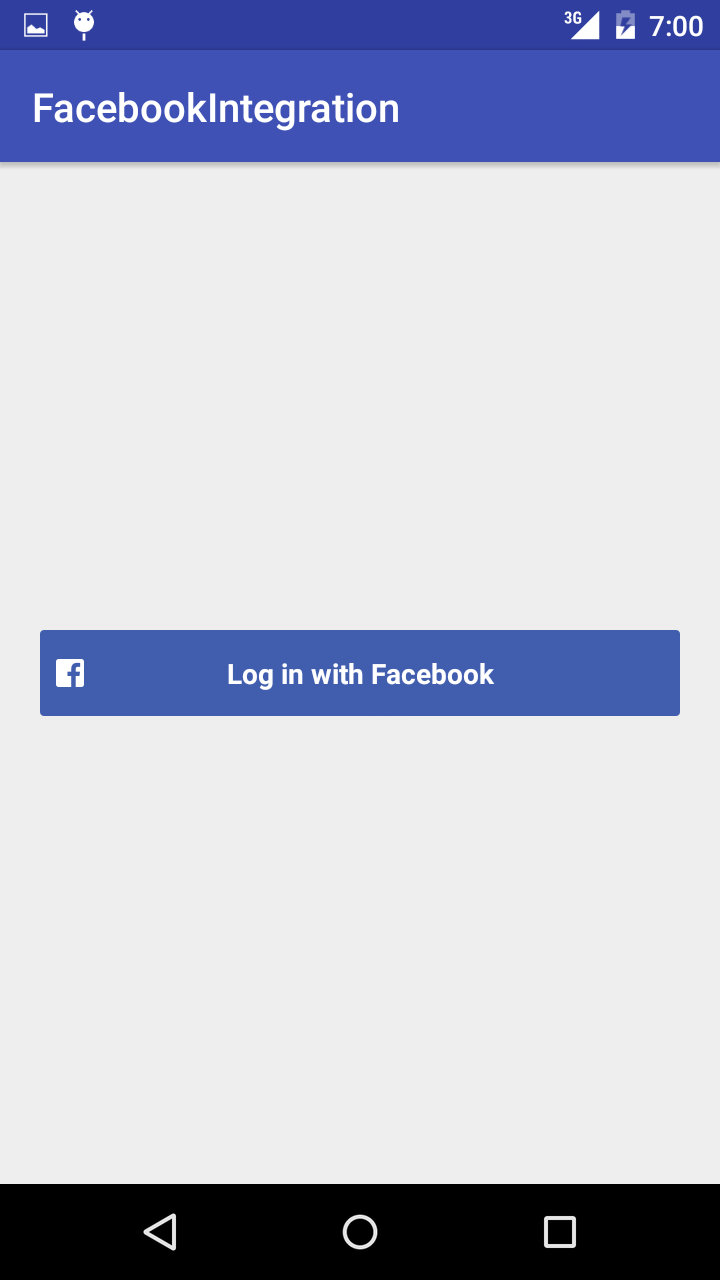
profileTracker.startTracking();Next we need to show the famous Facebook Log in button. We don’t need to make it from scratch as it exists inside the SDK’s libraries and can be called in our layout.
So we will edit our LoginActivity’s layout. It’s name should be content_login.xml. In fact, the latest version of Android Studio creates two default .xml files for every activity we create. The other layout file is called activity_login.xml.
In activity_login.xml delete the code for the floating button as we wont need it.
In content_login.xml there is only a TextView element. We will remove it and create a new LinearLayout that is horizontally oriented. Inside that layout we will add the log in button. Paste the code below to replace the current contents of content_login.xml:
<?xml version="1.0" encoding="utf-8"?>
<LinearLayout xmlns:android="http://schemas.android.com/apk/res/android"
android:layout_width="match_parent"
android:layout_height="match_parent"
android:orientation="horizontal">

<com.facebook.login.widget.LoginButton
    android:id="@+id/login_button"
    android:layout_width="match_parent"
    android:layout_height="wrap_content"
    android:layout_gravity="center_vertical"
    android:gravity="center"
    android:layout_margin="4dp"
    android:paddingTop="12dp"
    android:paddingBottom="12dp"/>

</LinearLayout>
I added some padding at the top and bottom and centered the horizontal linear layout. Let’s return to the Login class and create the button.
Inside the onCreate() method before the closing bracket, add the code below:
LoginButton loginButton = (LoginButton)findViewById(R.id.login_button);
callback = new FacebookCallback<LoginResult>() {
    @Override
    public void onSuccess(LoginResult loginResult) {
        AccessToken accessToken = loginResult.getAccessToken();
        Profile profile = Profile.getCurrentProfile();
        nextActivity(profile);
        Toast.makeText(getApplicationContext(), "Logging in...", Toast.LENGTH_SHORT).show();    }

    @Override
    public void onCancel() {
    }

    @Override
    public void onError(FacebookException e) {
    }
};
loginButton.setReadPermissions("user_friends");
loginButton.registerCallback(callbackManager, callback);
Here we create a connection between the button in content_login.xml and the Facebook SDK libraries.
There are some @Overrided methods that we need inside LoginActivity.java. Add the lines below:
@Override
protected void onResume() {
    super.onResume();
    //Facebook login
    Profile profile = Profile.getCurrentProfile();
    nextActivity(profile);
}

@Override
protected void onPause() {

    super.onPause();
}

protected void onStop() {
    super.onStop();
    //Facebook login
    accessTokenTracker.stopTracking();
    profileTracker.stopTracking();
}

@Override
protected void onActivityResult(int requestCode, int responseCode, Intent intent) {
    super.onActivityResult(requestCode, responseCode, intent);
    //Facebook login
    callbackManager.onActivityResult(requestCode, responseCode, intent);

}
The last function in this class is nextActivity() which will switch activities and pass data to the next activity.
private void nextActivity(Profile profile){
    if(profile != null){
        Intent main = new Intent(LoginActivity.this, MainActivity.class);
        main.putExtra("name", profile.getFirstName());
        main.putExtra("surname", profile.getLastName());
        main.putExtra("imageUrl", profile.getProfilePictureUri(200,200).toString());
        startActivity(main);
    }
}
We need the first and last name of the profile and a 200 by 200 pixel profile picture. At this stage we only get its Uri. These three strings will be used as extras in our next activity.
MainActivity Class
First we will create a logout button on the right hand side of the app’s toolbar.
@Override
public boolean onCreateOptionsMenu(Menu menu) {
    // Inflate the menu; this adds items to the action bar if it is present.
    getMenuInflater().inflate(R.menu.menu_login, menu);
    return true;
}

@Override
public boolean onOptionsItemSelected(MenuItem item) {
    // Handle action bar item clicks here. The action bar will
    // automatically handle clicks on the Home/Up button, so long
    // as you specify a parent activity in AndroidManifest.xml.
    int id = item.getItemId();

    //noinspection SimplifiableIfStatement
    if (id == R.id.action_settings) {
        logout();
        return true;
    }

    return super.onOptionsItemSelected(item);
}
We will create the logout() function later. Replace the contents of menu_login.xml with the following:
<menu
    xmlns:android="http://schemas.android.com/apk/res/android"
    xmlns:app="http://schemas.android.com/apk/res-auto"    xmlns:tools="http://schemas.android.com/tools"   tools:context="com.example.theodhor.facebookintegration.MainActivity">
    // Replace with your package name

    <item android:id="@+id/action_settings"
          android:title="@string/action_settings"
          android:orderInCategory="100"
          app:showAsAction="never"/>
</menu>
Change the current value of action_settings in strings.xml:
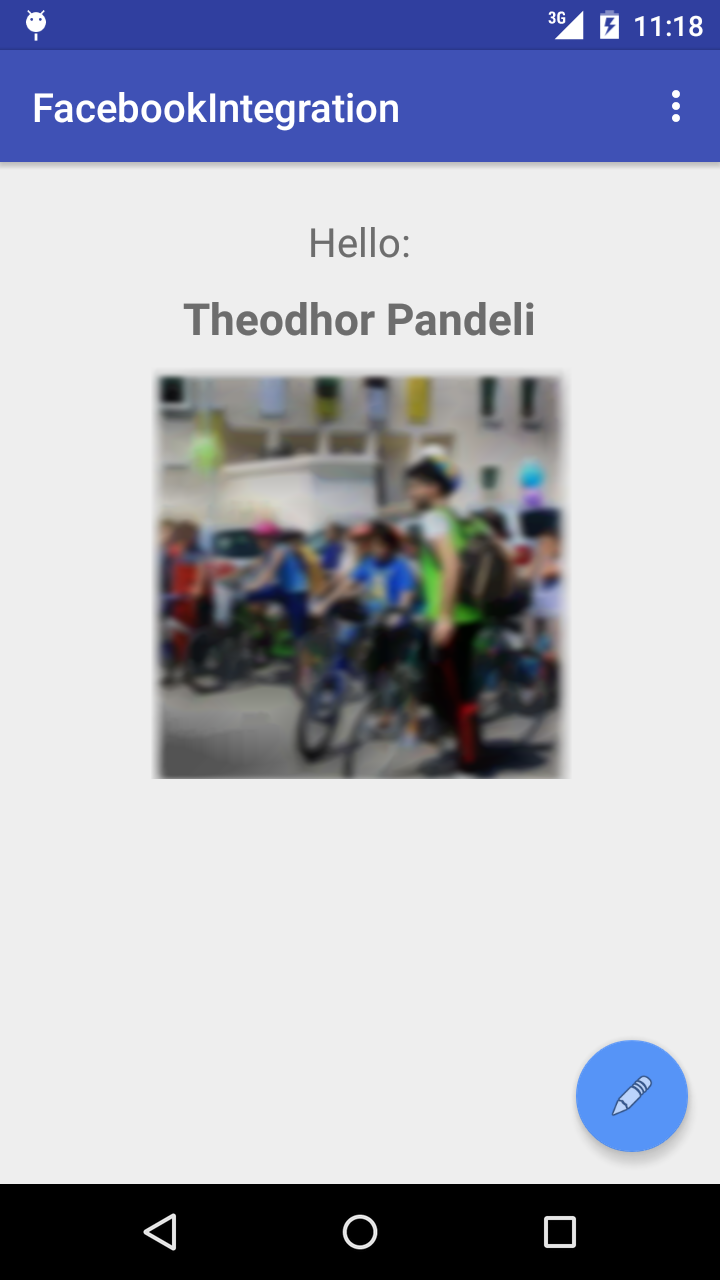
<string name="action_settings">LogOut</string>The nextActivity() function in the LoginActivity class passed some strings to our next activity. Now we use them by creating three other strings inside the onCreate() method of the MainActivity class and storing the passed data in them:
Bundle inBundle = getIntent().getExtras();
String name = inBundle.get("name").toString();
String surname = inBundle.get("surname").toString();
String imageUrl = inBundle.get("imageUrl").toString();
To display this data we need to change the content_main.xml layout. The code below adds the elements we need to display the data. Add this code inside the RelativeLayout tags:
<LinearLayout
    android:layout_width="match_parent"
    android:layout_height="match_parent"
    android:orientation="vertical">
    <TextView
        android:text="Hello:"
        android:layout_width="wrap_content"
        android:layout_height="wrap_content"
        android:layout_marginTop="10dp"
        android:textSize="20dp"
        android:layout_gravity="center_horizontal"/>
    <TextView
        android:layout_width="wrap_content"
        android:layout_height="wrap_content"
        android:id="@+id/nameAndSurname"
        android:textSize="22dp"
        android:textStyle="bold"
        android:layout_marginTop="10dp"
        android:layout_gravity="center_horizontal"/>
    <ImageView
        android:layout_width="200dp"
        android:layout_height="200dp"
        android:id="@+id/profileImage"
        android:layout_marginTop="10dp"
        android:layout_gravity="center_horizontal"/>
</LinearLayout>
To display the profile name add the code below to the onCreate() method of the MainActivity class:
TextView nameView = (TextView)findViewById(R.id.nameAndSurname);
nameView.setText("" + name + " " + surname);
Next we want to display the profile picture. From the last activity we have the picture Uri as a string. We can use this Uri to download the picture as a Bitmap file.
Create a new class, and add the code below:
public class DownloadImage extends AsyncTask<String, Void, Bitmap> {
    ImageView bmImage;

    public DownloadImage(ImageView bmImage) {
        this.bmImage = bmImage;
    }

    protected Bitmap doInBackground(String... urls) {
        String urldisplay = urls[0];
        Bitmap mIcon11 = null;
        try {
            InputStream in = new java.net.URL(urldisplay).openStream();
            mIcon11 = BitmapFactory.decodeStream(in);
        } catch (Exception e) {
            Log.e("Error", e.getMessage());
            e.printStackTrace();
        }
        return mIcon11;
    }

    protected void onPostExecute(Bitmap result) {
        bmImage.setImageBitmap(result);
    }
}
To display the profile picture in our app, add the line below inside the onCreate() method of the MainActivity class, after the last line added.
new DownloadImage((ImageView)findViewById(R.id.profileImage)).execute(imageUrl);It uses the imageUrl string, downloads the image and displays it inside the content_main.xml layout.
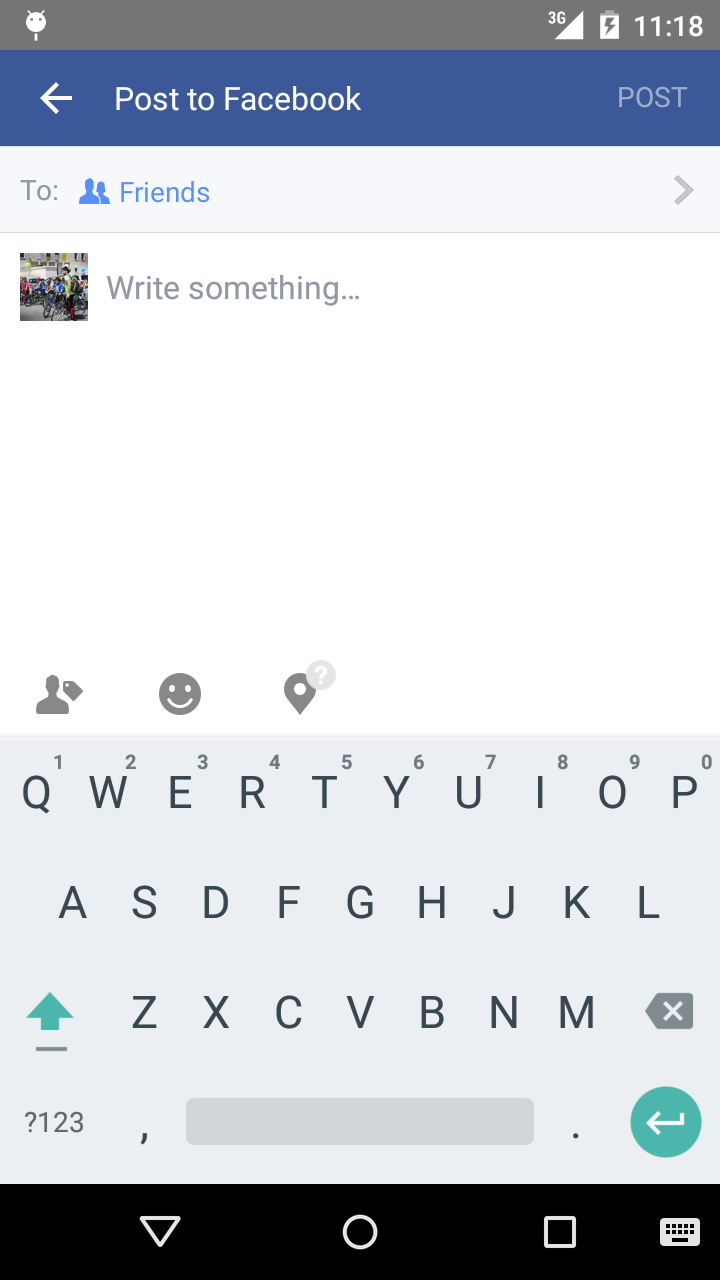
Now that displaying data is complete, we will add a share dialog to the floating action button so the app can post to Facebook.
Open activity_main.xml and change:
android:src="@android:drawable/ic_dialog_email"to:
android:src="@android:drawable/ic_menu_edit"Change the button color by editing the color values in colors.xml. I used this color:
<color name="colorAccent">#5694f7</color>Next to make the button do something.
Declare a private ShareDialog variable in the MainActivity class:
private ShareDialog shareDialog;Inside the onCreate() method create this dialog:
shareDialog = new ShareDialog(this);We want to show this dialog when we click the floating button. Replace the Snackbar code in the OnClick method with the code below:
ShareLinkContent content = new ShareLinkContent.Builder().build();
shareDialog.show(content);
Our app can now post to Facebook, but we are not finished yet, the Logout function is missing.
First the app needs to understand if it is logged in. Initialize the Facebook SDK as we did in LoginActivity by adding this line of code inside the onCreate() method:
FacebookSdk.sdkInitialize(getApplicationContext());Add the logout() function:
public void logout(){
    LoginManager.getInstance().logOut();
    Intent login = new Intent(MainActivity.this, LoginActivity.class);
    startActivity(login);
    finish();
}
Now you can run your app and post to Facebook! Please let me know in the comments below if you have any problems or questions.


 Plantas Medicinales, nuestro último app android


