viernes, 1 de julio de 2016

Google Play Services with Android 6.0 Marshmallow and Genymotion

Google Play Services with Android 6.0 Marshmallow and Genymotion

So, I think you want to install the Google Play Store & Services with an Android 6.0 Marshmallow Emulator?

To do that, follow either the long or the short version.

You need the following three files:

Short version:

  • Download all three files.
  • Create an emulator with the Nexus 5X image and start it.
  • Flash Genymotion-ARM-Translation_v1.1.zip and reboot.
  • Flash gapps-L-4-21-15.zip and reboot.
  • Sign into your Google Account.
  • Flash benzo-gapps-M-20151011-signed-chroma-r3.zip and reboot.
  • You are finished!

Long version:

Then start GenyMotion and add an emulator with the preset !! PREVIEW - Google Nexus 5X - 6.0.0 - API 23 - 1080x1920. Start it and wait until you see the homescreen.

The next step is to flash the Genymotion-ARM-Translation_v1.1.zip. To do that, just drap & drop the .zip file onto the emulator.

Turn the emulator off with the power button and wait until it is powered off. Then turn it on again.

Now repeat the last two steps with gapps-L-4-21-15.zip (flash, reboot).

If you are finished with that, sign into your Google account (you can do that when opening the Play Store). If you are successfully logged in, flash the benzo-gapps-M-20151011-signed-chroma-r3.zip file and reboot again.

Have fun with your working Google Play Store!

Source: gist.github.com

jueves, 30 de junio de 2016

Create Android Project

Make sure you have an up to date version of Android Studio. I am using version 1.4.1

Open Android Studio and create a New Project, naming it as you wish. Click Next, choose Minimum API level 17 and click Next again. Choose Blank Activity as the first activity, name it LoginActivity and click Finish.

Add Internet permissions to AndroidManifest.xml:


    <uses-permission android:name="android.permission.INTERNET" />

Next we add another blank activity to the project. Right Click the package and select New -> Activity -> Blank Activity. Leave its name as default and click finish.

The final project for this article can be found on Github. Make sure you change the Facebook API details to match you own.

Creating Facebook App ID

To use the Facebook API we have to add an app entry to our Facebook Developer Apps dashboard. You will need a Facebook developer account if you don’t have one already. Choose a random category and click Create App ID.

On the next page, scroll down to the bottom and complete both fields with the project packages names.
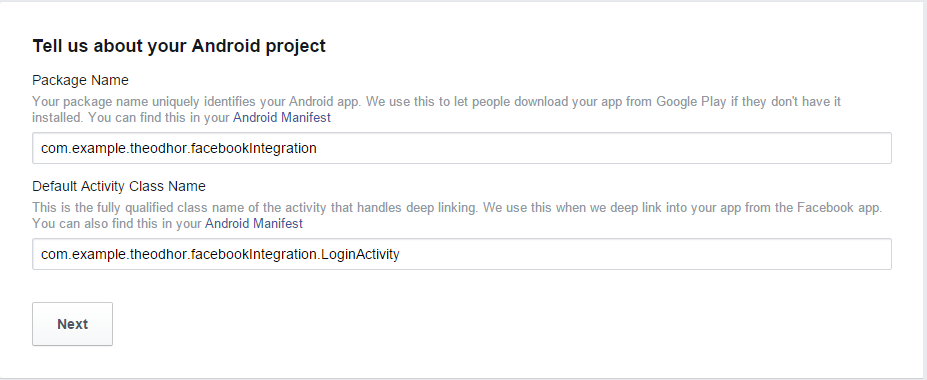
Package Names

Click Next.

Now we need to add a Development Key Hash. There are two ways of generating one. The first option is using the command line.

Windows

keytool -exportcert -alias androiddebugkey -keystore %HOMEPATH%\.android\debug.keystore | openssl sha1 -binary | openssl base64

Mac

keytool -exportcert -alias androiddebugkey -keystore ~/.android/debug.keystore | openssl sha1 -binary | openssl base64

Open Facebook’s My Apps section and copy the App ID:

App ID

Open strings.xml in your project and add this line of code:

<string name="app_id">{Your App ID here}</string>

Setting up Facebook SDK

Open build.gradle (Project) and add mavenCentral() to both repository sections. Then open build.gradle (Module) and add the SDK library by adding this line to `dependencies:

 compile 'com.facebook.android:facebook-android-sdk:4.6.0'
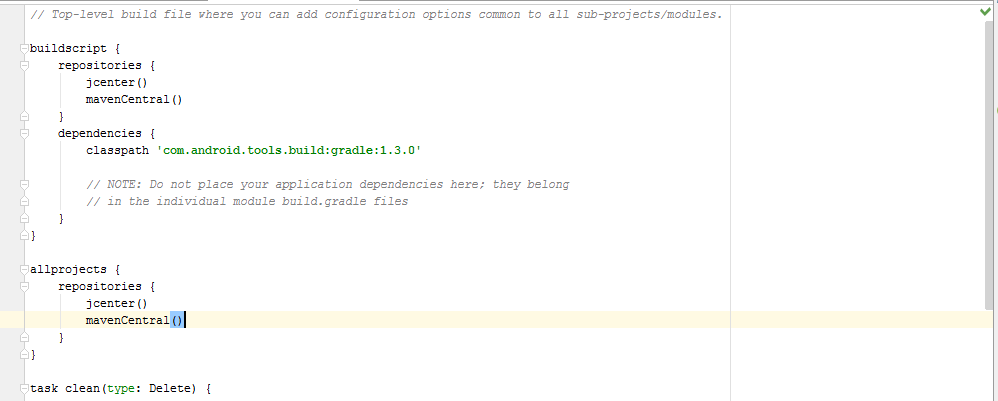
Adding dependencies

Now sync gradle.

Activities and Layouts

Open AndroidManifest.xml and make these changes.

Change the MainActivity label:

<activity
      android:name=".MainActivity"
      android:label="@string/app_name"            android:theme="@style/AppTheme.NoActionBar" >
</activity>

Add these tags:

<meta-data
    android:name="com.facebook.sdk.ApplicationId"
    android:value="@string/app_id" />

<activity
    android:name="com.facebook.FacebookActivity"
    android:label="@string/app_name"
    android:screenOrientation="portrait"/>

<provider              android:authorities="com.facebook.app.FacebookContentProvider"                 android:name="com.facebook.FacebookContentProvider"
android:exported="true"/>

Now we are going to work with Java classes and layouts.

First we are going to work with LoginActivity.java. This class opens an authenticated connection to the Facebook API and gets data from it.

Add these lines before the onCreate method inside the class:

private CallbackManager callbackManager;
private AccessTokenTracker accessTokenTracker;
private ProfileTracker profileTracker;

//Facebook login button
private FacebookCallback<LoginResult> callback = new FacebookCallback<LoginResult>() {
    @Override
    public void onSuccess(LoginResult loginResult) {
        Profile profile = Profile.getCurrentProfile();
        nextActivity(profile);
    }
    @Override
    public void onCancel() {        }
    @Override
    public void onError(FacebookException e) {      }
};

Here we create a FacebookCallback called callback. This executes the next action after we get a response from the Facebook API and the method for that is onSuccess().

Inside the onSuccess method we create a new Facebook Profile and get data for that profile. Later we will create a simple function called nextActivity() that will switch our activity.

We do not need the code for the FloatingActionButton so we will replace it. We are going to initialize the Facebook SDK so we can use its functions and methods. Inside onCreate() add these lines:

FacebookSdk.sdkInitialize(getApplicationContext());
callbackManager = CallbackManager.Factory.create();
accessTokenTracker = new AccessTokenTracker() {
    @Override
    protected void onCurrentAccessTokenChanged(AccessToken oldToken, AccessToken newToken) {
    }
};

profileTracker = new ProfileTracker() {
    @Override
    protected void onCurrentProfileChanged(Profile oldProfile, Profile newProfile) {
        nextActivity(newProfile);
    }
};
accessTokenTracker.startTracking();
profileTracker.startTracking();

Next we need to show the famous Facebook Log in button. We don’t need to make it from scratch as it exists inside the SDK’s libraries and can be called in our layout.

So we will edit our LoginActivity’s layout. It’s name should be content_login.xml. In fact, the latest version of Android Studio creates two default .xml files for every activity we create. The other layout file is called activity_login.xml.

In activity_login.xml delete the code for the floating button as we wont need it.

In content_login.xml there is only a TextView element. We will remove it and create a new LinearLayout that is horizontally oriented. Inside that layout we will add the log in button. Paste the code below to replace the current contents of content_login.xml:

<?xml version="1.0" encoding="utf-8"?>
<LinearLayout xmlns:android="http://schemas.android.com/apk/res/android"
android:layout_width="match_parent"
android:layout_height="match_parent"
android:orientation="horizontal">

<com.facebook.login.widget.LoginButton
    android:id="@+id/login_button"
    android:layout_width="match_parent"
    android:layout_height="wrap_content"
    android:layout_gravity="center_vertical"
    android:gravity="center"
    android:layout_margin="4dp"
    android:paddingTop="12dp"
    android:paddingBottom="12dp"/>

</LinearLayout>

I added some padding at the top and bottom and centered the horizontal linear layout. Let’s return to the Login class and create the button.
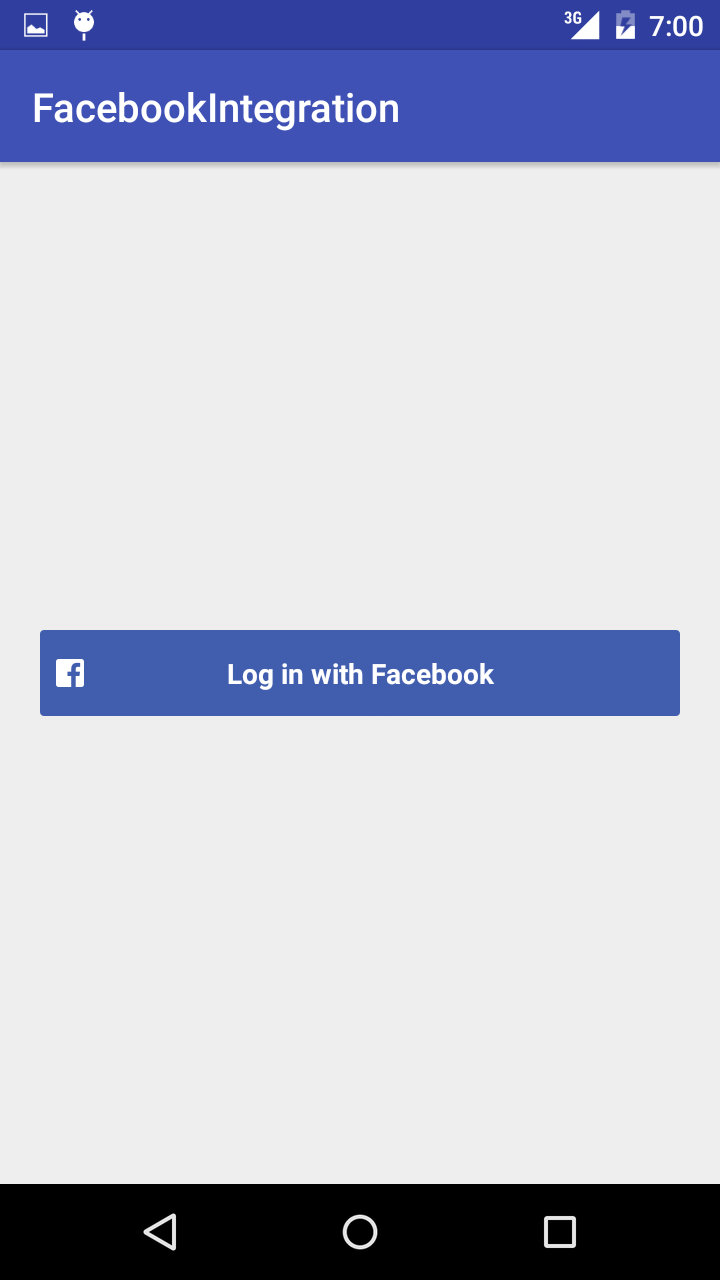
Login with Facebook

Inside the onCreate() method before the closing bracket, add the code below:

LoginButton loginButton = (LoginButton)findViewById(R.id.login_button);
callback = new FacebookCallback<LoginResult>() {
    @Override
    public void onSuccess(LoginResult loginResult) {
        AccessToken accessToken = loginResult.getAccessToken();
        Profile profile = Profile.getCurrentProfile();
        nextActivity(profile);
        Toast.makeText(getApplicationContext(), "Logging in...", Toast.LENGTH_SHORT).show();    }

    @Override
    public void onCancel() {
    }

    @Override
    public void onError(FacebookException e) {
    }
};
loginButton.setReadPermissions("user_friends");
loginButton.registerCallback(callbackManager, callback);

Here we create a connection between the button in content_login.xml and the Facebook SDK libraries.

There are some @Overrided methods that we need inside LoginActivity.java. Add the lines below:

@Override
protected void onResume() {
    super.onResume();
    //Facebook login
    Profile profile = Profile.getCurrentProfile();
    nextActivity(profile);
}

@Override
protected void onPause() {

    super.onPause();
}

protected void onStop() {
    super.onStop();
    //Facebook login
    accessTokenTracker.stopTracking();
    profileTracker.stopTracking();
}

@Override
protected void onActivityResult(int requestCode, int responseCode, Intent intent) {
    super.onActivityResult(requestCode, responseCode, intent);
    //Facebook login
    callbackManager.onActivityResult(requestCode, responseCode, intent);

}

The last function in this class is nextActivity() which will switch activities and pass data to the next activity.

private void nextActivity(Profile profile){
    if(profile != null){
        Intent main = new Intent(LoginActivity.this, MainActivity.class);
        main.putExtra("name", profile.getFirstName());
        main.putExtra("surname", profile.getLastName());
        main.putExtra("imageUrl", profile.getProfilePictureUri(200,200).toString());
        startActivity(main);
    }
}

We need the first and last name of the profile and a 200 by 200 pixel profile picture. At this stage we only get its Uri. These three strings will be used as extras in our next activity.

MainActivity Class

First we will create a logout button on the right hand side of the app’s toolbar.

@Override
public boolean onCreateOptionsMenu(Menu menu) {
    // Inflate the menu; this adds items to the action bar if it is present.
    getMenuInflater().inflate(R.menu.menu_login, menu);
    return true;
}

@Override
public boolean onOptionsItemSelected(MenuItem item) {
    // Handle action bar item clicks here. The action bar will
    // automatically handle clicks on the Home/Up button, so long
    // as you specify a parent activity in AndroidManifest.xml.
    int id = item.getItemId();

    //noinspection SimplifiableIfStatement
    if (id == R.id.action_settings) {
        logout();
        return true;
    }

    return super.onOptionsItemSelected(item);
}

We will create the logout() function later. Replace the contents of menu_login.xml with the following:

<menu
    xmlns:android="http://schemas.android.com/apk/res/android"
    xmlns:app="http://schemas.android.com/apk/res-auto"    xmlns:tools="http://schemas.android.com/tools"   tools:context="com.example.theodhor.facebookintegration.MainActivity">
    // Replace with your package name

    <item android:id="@+id/action_settings"
          android:title="@string/action_settings"
          android:orderInCategory="100"
          app:showAsAction="never"/>
</menu>

Change the current value of action_settings in strings.xml:

<string name="action_settings">LogOut</string>

The nextActivity() function in the LoginActivity class passed some strings to our next activity. Now we use them by creating three other strings inside the onCreate() method of the MainActivity class and storing the passed data in them:

Bundle inBundle = getIntent().getExtras();
String name = inBundle.get("name").toString();
String surname = inBundle.get("surname").toString();
String imageUrl = inBundle.get("imageUrl").toString();

To display this data we need to change the content_main.xml layout. The code below adds the elements we need to display the data. Add this code inside the RelativeLayout tags:

<LinearLayout
    android:layout_width="match_parent"
    android:layout_height="match_parent"
    android:orientation="vertical">
    <TextView
        android:text="Hello:"
        android:layout_width="wrap_content"
        android:layout_height="wrap_content"
        android:layout_marginTop="10dp"
        android:textSize="20dp"
        android:layout_gravity="center_horizontal"/>
    <TextView
        android:layout_width="wrap_content"
        android:layout_height="wrap_content"
        android:id="@+id/nameAndSurname"
        android:textSize="22dp"
        android:textStyle="bold"
        android:layout_marginTop="10dp"
        android:layout_gravity="center_horizontal"/>
    <ImageView
        android:layout_width="200dp"
        android:layout_height="200dp"
        android:id="@+id/profileImage"
        android:layout_marginTop="10dp"
        android:layout_gravity="center_horizontal"/>
</LinearLayout>

To display the profile name add the code below to the onCreate() method of the MainActivity class:

TextView nameView = (TextView)findViewById(R.id.nameAndSurname);
nameView.setText("" + name + " " + surname);

Next we want to display the profile picture. From the last activity we have the picture Uri as a string. We can use this Uri to download the picture as a Bitmap file.

Create a new class, and add the code below:

public class DownloadImage extends AsyncTask<String, Void, Bitmap> {
    ImageView bmImage;

    public DownloadImage(ImageView bmImage) {
        this.bmImage = bmImage;
    }

    protected Bitmap doInBackground(String... urls) {
        String urldisplay = urls[0];
        Bitmap mIcon11 = null;
        try {
            InputStream in = new java.net.URL(urldisplay).openStream();
            mIcon11 = BitmapFactory.decodeStream(in);
        } catch (Exception e) {
            Log.e("Error", e.getMessage());
            e.printStackTrace();
        }
        return mIcon11;
    }

    protected void onPostExecute(Bitmap result) {
        bmImage.setImageBitmap(result);
    }
}

To display the profile picture in our app, add the line below inside the onCreate() method of the MainActivity class, after the last line added.

new DownloadImage((ImageView)findViewById(R.id.profileImage)).execute(imageUrl);

It uses the imageUrl string, downloads the image and displays it inside the content_main.xml layout.

Profile information

Now that displaying data is complete, we will add a share dialog to the floating action button so the app can post to Facebook.

Open activity_main.xml and change:

android:src="@android:drawable/ic_dialog_email"

to:

android:src="@android:drawable/ic_menu_edit"

Change the button color by editing the color values in colors.xml. I used this color:

<color name="colorAccent">#5694f7</color>

Next to make the button do something.

Declare a private ShareDialog variable in the MainActivity class:

private ShareDialog shareDialog;

Inside the onCreate() method create this dialog:

shareDialog = new ShareDialog(this);

We want to show this dialog when we click the floating button. Replace the Snackbar code in the OnClick method with the code below:

ShareLinkContent content = new ShareLinkContent.Builder().build();
shareDialog.show(content);

Our app can now post to Facebook, but we are not finished yet, the Logout function is missing.

First the app needs to understand if it is logged in. Initialize the Facebook SDK as we did in LoginActivity by adding this line of code inside the onCreate() method:

FacebookSdk.sdkInitialize(getApplicationContext());

Add the logout() function:

public void logout(){
    LoginManager.getInstance().logOut();
    Intent login = new Intent(MainActivity.this, LoginActivity.class);
    startActivity(login);
    finish();
}
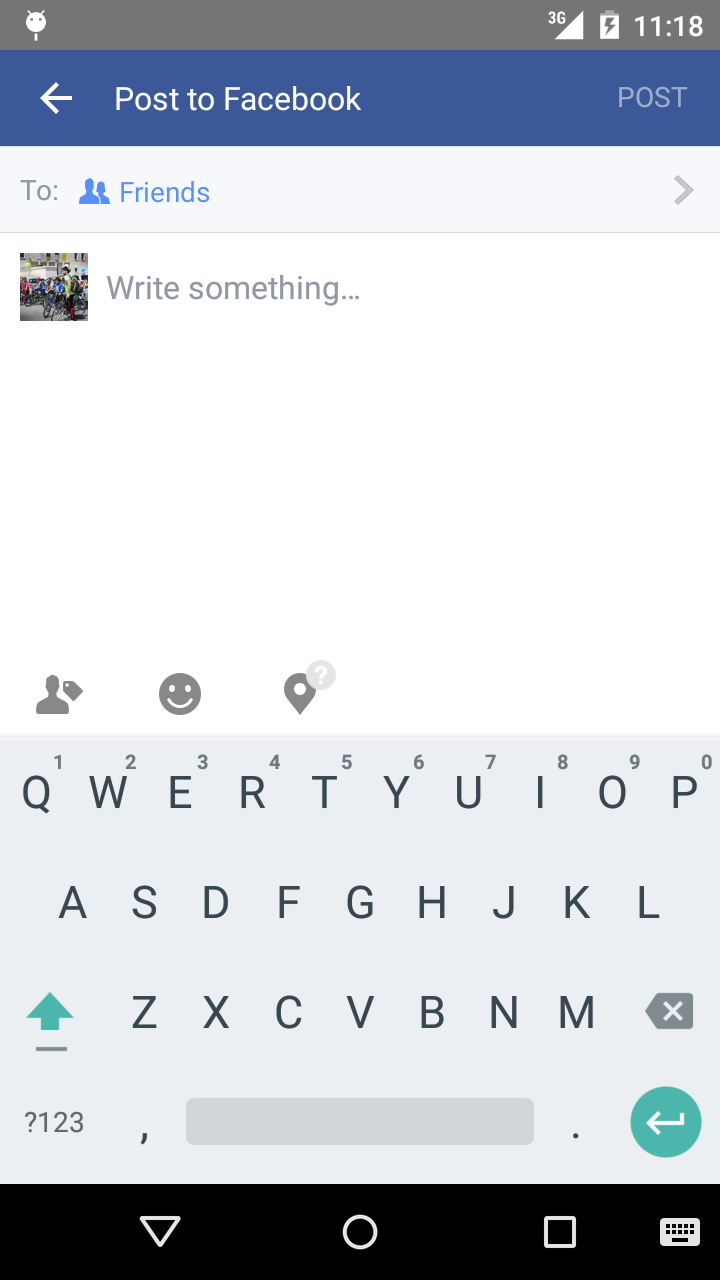
Share to Facebook

Now you can run your app and post to Facebook! Please let me know in the comments below if you have any problems or questions.

jueves, 5 de mayo de 2016

lunes, 1 de febrero de 2016

HTML5 Novedades:

Doctype: 


metaset:

Nueva semántica:
,
,
,


Nuevo gráfico: ,

Nueva multimedia: ,

Nuevas API de programación HTML5:

HTML Geolocation, HTML Drag and Drop, HTML Local Storage, HTML Application Cache, HTML Web Workers, HTML SSE.


Elementos removidos en HTML5.

lunes, 25 de enero de 2016


PRE REQUISITOS:

- Pre instalación de mongo database en su versión 10gen... Si no has hecho la instalación puedes seguir esta guía: Instalar MongoDB 3.X en Ubuntu - (Opcional) Desde windows, pre instalar el programa Vim para evitar conflictos de espacios, derivando en archivos corruptos al traspasar a Linux las ediciones. Una vez en el VIM, si copias y pegas segmentos o preferiblemente siempre antes de guardar ejecuta lo siguiente: :set fileformat=unix

1) VERIFICACIÓN DE PERMISOS

Lo primero que debemos hacer es verificar los permisos de las carpetas /var/lib/mongodb y /data/db , de las cuales usaremos /data/db en nuestro archivos de configuración que veremos a continuación; por lo tanto, debemos asegurarnos que ambas carpetas tengan el usuario requerido por mongo. En las instalaciones default por lo general se requiere que estas carpetas tengan los usuarios "mongodb" y "root" con acceso a todas las subcarpetas y archivos.

Para equiparar permisos se puede utilizar el siguiente script: sudo chown -R /data/db

No está demás indicar un comando para buscar nombres de archivos en todo el sistema antes de continuar: $ find / -mount -name '*'

2) ARCHIVO MONGOD.CONF EN LA CARPETA /etc

Este archivo posiblemente se haya creado con la instalación de mongo, de igual manera dejaré un ejemplo que está funcionando:
# mongod.conf
 
# for documentation of all options, see:
#   http://docs.mongodb.org/manual/reference/configuration-options/
 
# Where and how to store data.
storage:
  dbPath: /data/db
  journal: 
    enabled: true
#  engine:
#  mmapv1:
#  wiredTiger:
 
# where to write logging data.
systemLog:
  destination: file
  logAppend: true
  path: /var/log/mongodb/mongod.log
 
# network interfaces
net:
  port: 27017
  bindIp: 0.0.0.0
 
#operationProfiling:
 
#replication:
 
#sharding:
 
## Enterprise-Only Options:
 
#auditLog:
 
#snmp:


3) ARCHIVO MONGODB EN LA CARPETA /etc/init.d - Este archivo es el script daemon que invocará el servicio llamando a su vez al otro archivo .conf de la carpeta etc... - Un ejemplo de script daemon mongo funcionando:
# !/bin/sh
### BEGIN INIT INFO
# Provides:          mongodbstartup
# Required-Start:    $remote_fs $syslog
# Required-Stop:     $remote_fs $syslog
# Default-Start:     2 3 4 5
# Default-Stop:      0 1 6
# Short-Description: Start mongo database instance at boot time
# Description:       Enable service provided by mongo.
### END INIT INFO

# mongodb     Startup script for the mongodb server
#
# chkconfig: - 64 36
# description: MongoDB Database Server
#
# processname: mongodb
#
#set -e
#set -u
# Source function library
#. /etc/rc.d/init.d/functions

. /lib/lsb/init-functions

#if [ -f /etc/sysconfig/mongodb ]; then
#        . /etc/sysconfig/mongodb
#fi
prog="mongod"
mongod="/usr/bin/mongod"
mongodb_user="luiseliberal"
RETVAL=0

start() {
        echo -n $"Starting $prog: "
        #daemon $mongod "--fork --logpath /var/log/mongodb/mongod.log --logappend 2>&1 >> /var/log/mongodb/mongod.log"
        daemon --user=$mongodb_user $mongod "--config /etc/init/mongod.conf"
        RETVAL=$?
        echo
        [ $RETVAL -eq 0 ] && touch /var/lock/subsys/$prog
        return $RETVAL
}

stop() {
        echo -n $"Stopping $prog: "
        killproc $prog
        RETVAL=$?
        echo
        [ $RETVAL -eq 0 ] && rm -f /var/lock/subsys/$prog
        return $RETVAL
}
reload() {
        echo -n $"Reloading $prog: "
        killproc $prog -HUP
        RETVAL=$?
        echo
        return $RETVAL
}

case "$1" in
        start)
                start
                ;;
        stop)
                stop
                ;;
        restart)
                stop
                start
                ;;
        condrestart)
                if [ -f /var/lock/subsys/$prog ]; then
                        stop
                        start
                fi
                ;;
        reload)
                reload
                ;;
        status)
                status $mongod
                RETVAL=$?
                ;;
        *)
                echo $"Usage: $0 {start|stop|restart|condrestart|reload|status}"
if [ -f /var/lib/mongodb/mongod.lock ] ; then
        rm /var/lib/mongodb/mongod.lock
fi

if [ -f /data/db/mongod.lock ] ; then
        rm /data/db/mongod.lock
fi

        mongod --repair
     mongod --auth
                RETVAL=1
esac

exit $RETVAL


4) Inclusión del script daemon en las llaves del sistema ubuntu

Para añadir el script:
root@skx:~# update-rc.d  defaults
 Adding system startup for /etc/init.d/blah ...
   /etc/rc0.d/K20blah -> ../init.d/blah
   /etc/rc1.d/K20blah -> ../init.d/blah
   /etc/rc6.d/K20blah -> ../init.d/blah
   /etc/rc2.d/S20blah -> ../init.d/blah
   /etc/rc3.d/S20blah -> ../init.d/blah
   /etc/rc4.d/S20blah -> ../init.d/blah
   /etc/rc5.d/S20blah -> ../init.d/blah


Para remover el script:
root@skx:/etc/rc2.d# update-rc.d -f  remove
update-rc.d: /etc/init.d/blah exists during rc.d purge (continuing)
 Removing any system startup links for /etc/init.d/blah ...
   /etc/rc0.d/K20blah
   /etc/rc1.d/K20blah
   /etc/rc2.d/S20blah
   /etc/rc3.d/S20blah
   /etc/rc4.d/S20blah
   /etc/rc5.d/S20blah
   /etc/rc6.d/K20blah


5) EJECUCIÓN Y TEST - Algo muy importante es el probar estos archivos y para ello puedes ejecutar desde la consola, ubicándote en la carpeta contenedora el siguiente comando:

Para iniciarlo: ./mongodb
Para iniciarlo y verificar la ejecución: ./mongodb > mongodbtest (mongodbtest es un archivo creado en la misma carpeta)

- El log para visualizar los errores y avances en la concreción del script estaría ubicado en la siguiente ruta de sistema: /var/log/boot.log y pasando este nivel el próximo log sería el que se tiene parametrizado en los scripts; en mi caso esta en la ruta: var/log/mongodb/mongodb.log

Es importante también no confundir Upstart (etc/init) con los tradicionales scripts Daemon (etc/init.d), partiendo de que son configuraciones distintas y se ubican en repositorios distintos.

SHARD MONGO SERVERS (AVANZADO) http://www.joslynesser.com/blog/archives/2010/09/28/mongodb-sharding-guide-server-setup-on-ubuntu-ec2/


PRE REQUISITOS:

- Pre instalación de mongo database en su versión 10gen... Si no has hecho la instalación puedes seguir esta guía: Instalar MongoDB 3.X en Ubuntu
- (Opcional) Desde windows, pre instalar el programa Vim para evitar conflictos de espacios, derivando en archivos corruptos al traspasar a Linux las ediciones. Una vez en el VIM, si copias y pegas segmentos o preferiblemente siempre antes de guardar ejecuta lo siguiente:
:set fileformat=unix

1) VERIFICACIÓN DE PERMISOS

Lo primero que debemos hacer es verificar los permisos de las carpetas /var/lib/mongodb y /data/db , de las cuales usaremos /data/db en nuestro archivos de configuración que veremos a continuación; por lo tanto, debemos asegurarnos que ambas carpetas tengan el usuario requerido por mongo. En las instalaciones default por lo general se requiere que estas carpetas tengan los usuarios "mongodb" y "root" con acceso a todas las subcarpetas y archivos.

Para equiparar permisos se puede utilizar el siguiente script:
sudo chown -R /data/db

No está demás indicar un comando para buscar nombres de archivos en todo el sistema antes de continuar:
$ find / -mount -name '*'

2) ARCHIVO MONGOD.CONF EN LA CARPETA /etc

Este archivo posiblemente se haya creado con la instalación de mongo, de igual manera dejaré un ejemplo que está funcionando:
# mongod.conf

# for documentation of all options, see:
#   http://docs.mongodb.org/manual/reference/configuration-options/

# Where and how to store data.
storage:
  dbPath: /data/db
  journal: 
    enabled: true
#  engine:
#  mmapv1:
#  wiredTiger:

# where to write logging data.
systemLog:
  destination: file
  logAppend: true
  path: /var/log/mongodb/mongod.log

# network interfaces
net:
  port: 27017
  bindIp: 0.0.0.0

#operationProfiling:

#replication:

#sharding:

## Enterprise-Only Options:

#auditLog:

#snmp:


3) ARCHIVO MONGODB.CONF EN LA CARPETA /etc/init - Este archivo es el script upstart que invocará el servicio llamando a su vez al otro archivo .conf de la carpeta etc... Se basa en YAML por lo cual hay que tener cuidado con la posición de los comandos, en particular separar el "valor" de la declaración por un espacio en blanco.

- Un ejemplo de script upstart mongo funcionando:


# Ubuntu upstart file at /etc/init/mongodb.conf

pre-start script
    mkdir -p /var/lib/mongodb/
    mkdir -p /var/log/mongodb/
end script

start on runlevel [2345]
stop on runlevel [06]

script
  ENABLE_MONGODB="yes"
  if [ -f /etc/default/mongodb ]; then . /etc/default/mongodb; fi
  if [ "x$ENABLE_MONGODB" = "xyes" ]; then
        if [ -f /var/lib/mongodb/mongod.lock ]; then
                rm /var/lib/mongodb/mongod.lock
                #sudo -u mongodb /usr/bin/mongod --config /etc/mongod.conf --repair
        fi

        if [ -f /data/db/mongod.lock ]; then
                rm /data/db/mongod.lock
        fi

        exec start-stop-daemon --start --quiet --chuid mongodb --exec  /usr/bin/mongod -- --config /etc/mongod.conf
  fi
end script


4) EJECUCIÓN Y TEST

- Algo muy importante es el probar estos archivos y para ello puedes ejecutar desde la consola, ubicándote en la carpeta contenedora el siguiente comando:

Para iniciarlo: sudo service mongodb start
Para ver el estatus: sudo service mongodb status
Para detenerlo: sudo service mongodb stop

- El log para visualizar los errores y avances en la concreción del script estaría ubicado en la siguiente ruta de sistema:
/var/log/upstart/mongodb.log y pasando este nivel el próximo log sería el que se tiene parametrizado en los scripts; en mi caso esta en la ruta: var/log/mongodb/mongodb.log

Es importante también no confundir Upstart (etc/init) con los tradicionales scripts Daemon (etc/init.d), partiendo de que son configuraciones distintas y se ubican en repositorios distintos. Para profundizar UBUNTU STARTUP INIT SCRIPTS METHODS

SHARD MONGO SERVERS (AVANZADO)

http://www.joslynesser.com/blog/archives/2010/09/28/mongodb-sharding-guide-server-setup-on-ubuntu-ec2/

jueves, 21 de enero de 2016

Ejecutar los comandos siguientes en la consola:

mongoexport --db sec_medicinales_ppal --collection hierbas --out sec_bk.json

Donde sec_medicinales_ppal es el nombre de la base de datos, hierbas la colección(lo que se entiende en bases de dato relaciones como tablas) y sec_bk.json el archivo donde se escribirán los datos.

miércoles, 20 de enero de 2016


START MONGOD SERVER

mongod
mongod --port

Si hay problemas al iniciar mongo, se debe verificar no exista un archivo .lock en las carpetas de mongo, de existir lo eliminamos.

STOP MONGOD SERVER

use admin db.shutdownServer()

INSTANCIA ESPECIFICA

kill

LISTAR BASES DE DATOS

show dbs

USAR BASE DE DATOS

use

MOSTRAR TABLAS EXISTENTES EN LA BASE DE DATOS

show collections
db.getCollectionNames()


INSERT DATOS EN TABLA

db.herb.insert({name:"Anis", descripcion:"Planta de buen aroma"})


jueves, 7 de enero de 2016

JDeveloper 11gR2 - Integrado Weblogic servidor Password Reset Hola a todos. Después de meses de trabajo con ADF Essentials, que necesitaba para iniciar sesión en la aplicación de la consola del servidor integrado Weblogic que viene con JDeveloper 11.1.2.3 (Weblogic servidor 10.3.5) y luego me di cuenta que se me ha olvidado la contraseña del usuario weblogic ... Así que me puse a buscar y encontré dos soluciones:

Solución 1: Elimine la carpeta de dominio predeterminado creado por el servidor Weblogic Integrado.
Solución 2: Generar una nueva contraseña para el usuario weblogic.

¿Cuál es la diferencia entre una solución de 1 y 2?

En la solución 1, perderá cualquier configuración que usted ha hecho a su servidor weblogic integrado, esto incluye: fuentes de datos, configuración de seguridad, etc.

En solución 2, perderá sólo configuraciones de seguridad que ha realizado. Por ejemplo, si ha creado más usuarios o grupos, o configurar el acceso a un servicio LDAP externo, pero se mantendrá todo lo demás. Tengo que decir que esta solución es más difícil que la solución 1.

Si usted no ha hecho ninguna configuración en el servidor Weblogic integrado, te sugiero que vayas con una solución de 1. Antes de continuar con las soluciones, primero tenemos que encontrar el directorio de sistema de IDE. Con el fin de hacer eso, JDeveloper abierta, vaya al menú Ayuda y seleccione la opción Acerca de. Una ventana emergente aparece, seleccione la ficha Propiedades y desplácese hacia abajo hasta que encuentre alguna de estas: ide.pref.dir o ide.system.dir o ide.user.dir

En un entorno Linux, puede encontrar algo como esto:


En un entorno de ventanas, puede encontrar algo como esto:


En realidad, el directorio que estamos buscando es la ide.system.dir por lo que permite anótelo para que podamos utilizarlo más tarde:

Linux (mi caso, la suya puede ser diferente)
SYS_DIR = / home / aalopez / .jdeveloper / system.11.1.2.3.39.62.76.1

De Windows (mi caso, la suya puede ser diferente)
SYS_DIR = C: \ Users \ CVDESA \ AppData \ Roaming \ JDeveloper \ system11.1.2.3.39.62.76.1

Hacer servidor Weblogic seguro se apaga antes de continuar.

Solución 1: Extracción de la carpeta DefaultDomain.
La primera y más fácil solución es quitar la carpeta siguiente (DefaultDomain):
SYS_DIR / DefaultDomain

La carpeta obtendrá re-creado para usted la próxima vez que inicie el servidor Weblogic. El problema es que usted perderá cualquier configuración que pueda haber hecho que incluye: usuarios, contraseñas, fuentes de datos, etc. Todo eso. Una vez que se quita la carpeta, JDeveloper abierta ir al menú Ejecutar, y seleccione la opción Start Server Instancia (IntegratedWeblogicServer). Una ventana emergente aparece pidiéndole que establezca las credenciales de usuario weblogic. ¡Eso es!

Solución 2: Cambiar la contraseña de usuario weblogic Por favor, siga los pasos a seguir con el fin restablecer la contraseña en un sistema Linux (Ubuntu 12.1), también se presentan los pasos para el sistema de Windows:

Linux
Ir a esta ruta: SYS_DIR / DefaultDomain / bin, donde SYS_DIR es el camino que hemos definido anteriormente. Ejecute el setDomainEnvironment.sh Ir a esta ruta: SYS_DIR / DefaultDomain / seguridad Cambie el nombre del archivo DefaultAuthenticatorInit.ldift a algo como oldDefaultAuthenticatorInit.ldift Exportar el archivo weblogic.jar a la ruta de clases, para que podamos crear una nueva contraseña para el usuario weblogic (en mi caso, el directorio de instalación de JDeveloper es / home / aalopez / Oracle): export CLASSPATH = $ CLASSPATH: /home/aalopez/Oracle/Middleware/wlserver_10.3/server/lib/weblogic.jar Ejecute el siguiente comando para crear la nueva contraseña. Observe que el comando tiene un punto al final, esto es necesario para que se cree la nueva contraseña en el directorio actual. Cambie NEW_PASSSWORD para la nueva contraseña del usuario weblogic: java weblogic.security.utils.AdminAccount weblogic new_password. Ir a esta ruta: SYS_DIR / DefaultDomain / servidores / DefaultServer Cambie el nombre del directorio de datos a algo como data_old Ir a esta ruta: SYS_DIR / DefaultDomain / servidores / DefaultServer / seguridad Cambie el nombre del archivo boot.properties a algo como oldboot.properties Crear un nuevo archivo boot.properties en el mismo directorio. Esto es necesario si se quiere autoconectarse al iniciar el servidor Weblogic desde dentro de JDeveloper. El contenido del archivo debe ser algo como lo siguiente (cambiar new_password la contraseña que ha definido en los pasos anteriores): nombre de usuario = weblogic password = new_password Es hora de probar nuestros cambios. Ir a esta ruta: SYS_DIR / DefaultDomain / bin Ejecute el archivo startWeblogic.sh y verifique que el servidor Weblogic inicia sin excepciones. Abra un navegador y escriba la siguiente dirección URL (el puerto puede ser diferente para usted): http: // localhost: 7101 / console La aplicación de consola del servidor Weblogic debe mostrar y se puede iniciar sesión con sus credenciales nuevas. Cuando esté listo para detener el servidor Weblogic, ir a esta ruta: SYS_DIR / DefaultDomain / bin Ejecute el archivo stopWeblogic.sh con el fin de detener el servidor.

Hay un paso extra que vamos a cubrir después comprobamos los pasos de Windows:

Ventanas
Ir a esta ruta: SYS_DIR \ DefaultDomain \ bin, donde SYS_DIR es el camino que hemos definido anteriormente. Ejecute el setDomainEnvironment.cmd Ir a esta ruta: SYS_DIR \ DefaultDomain \ security Cambie el nombre del archivo DefaultAuthenticatorInit.ldift a algo como oldDefaultAuthenticatorInit.ldift Ejecute el siguiente comando para crear la nueva contraseña. Observe que el comando tiene un punto al final, esto es necesario para que se cree la nueva contraseña en el directorio actual. Cambie NEW_PASSSWORD para la nueva contraseña del usuario weblogic: java weblogic.security.utils.AdminAccount weblogic new_password. Ir a esta ruta: SYS_DIR \ DefaultDomain \ servers \ DefaultServer Cambie el nombre del directorio de datos a algo como data_old Ir a esta ruta: SYS_DIR \ DefaultDomain \ servers \ DefaultServer \ security Cambie el nombre del archivo boot.properties a algo como oldboot.properties Crear un nuevo archivo boot.properties en el mismo directorio. Esto es necesario si se quiere autoconectarse al iniciar el servidor Weblogic desde dentro de JDeveloper. El contenido del archivo debe ser algo como lo siguiente (cambiar new_password la contraseña que ha definido en los pasos anteriores): nombre de usuario = weblogic password = new_password Es hora de probar nuestros cambios. Ir a esta ruta: SYS_DIR \ DefaultDomain \ bin Ejecute el archivo startWeblogic.cmd y verifique que el servidor Weblogic inicia sin excepciones. Abra un navegador y escriba la siguiente dirección URL (el puerto puede ser diferente para usted): http: // localhost: 7101 / console La aplicación de consola del servidor Weblogic debe mostrar y se puede iniciar sesión con sus credenciales nuevas. Cuando esté listo para detener el servidor Weblogic, ir a esta ruta: SYS_DIR \ DefaultDomain \ bin Ejecute el archivo stopWeblogic.cmd con el fin de detener el servidor.

Una vez que haya cambiado y puesto a prueba la nueva contraseña para el usuario weblogic, es hora de actualizar la información de JDeveloper. Abra JDeveloper e ir a la paleta de recursos, si no lo encuentra, vaya al menú Ver y selecciona la opción Paleta de recursos:


Allí, seleccione la categoría Application Server y el IntegratedWebLogicServer. Haga clic derecho y seleccione la opción Propiedades. Una nueva ventana emergente aparece, seleccione la ficha Autenticación:


No se puede establecer la nueva contraseña de usuario weblogic que acaba de definir pasos anteriores. Aplicar cambios y eso es todo!
Subscribe to RSS Feed Sígueme en twitter!